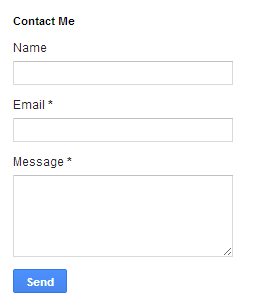
A few days ago blogger introduces new widget Contact Form which you can add to your blog easily.
The Contact Form of blogger has following options:
1-Username
2-Email
3-Message(text area)
4-Submit button

How to add contact form widget to blog
- Go to layout tab
- Click on add gadget in same section you want to show i.e. in sidebar
- Then select more gadgets
- Add contact form gadget
How to style your contact form in blog
/* Contact Form Container */
.contact-form-widget {
width: 500px;
max-width: 100%;
margin: 0 auto;
padding: 10px;
background: #F8F8F8;
color: #000;
border: 1px solid #C1C1C1;
box-shadow: 0 1px 4px rgba(0, 0, 0, 0.25);
border-radius: 10px;
}
/* Fields and submit button */
.contact-form-name, .contact-form-email, .contact-form-email-message {
width: 100%;
max-width: 100%;
margin-bottom: 10px;
}
/* Submit button style */
.contact-form-button-submit {
border-color: #C1C1C1;
background: #E3E3E3;
color: #585858;
width: 20%;
max-width: 20%;
margin-bottom: 10px;
}
/* Submit button on mouseover */
.contact-form-button-submit:hover{
background: #4C8EF9;
color: #ffffff;
border: 1px solid #FAFAFA;
}
This is how this form looks after applying the above style

- Go to Template
- Click on sideways arrow next to <b:skin>...</b:skin>
- Then paste the above code ,above the ]]><</b:skin> (press Ctrl+F to find)
How to add contract form in Static Page
- Go to Template
- Then click on Edit Html
- Then there you have to search for the id "ContactForm",
- Expand the widget by clicking on the black arrow on the left side (same with the includeable)
- Then delete the following part that i have mentioned in red colour
(See below)

The part to be removed
<b:widget id='ContactForm1' locked='false' title='Contact Form' type='ContactForm'>
<b:includable id='main'>
<b:if cond='data:title != ""'>
<h2 class='title'><data:title/></h2>
</b:if>
<div class='contact-form-widget'>
<div class='form'>
<form name='contact-form'>
<p/>
<data:contactFormNameMsg/>
<br/>
<input class='contact-form-name' expr:id='data:widget.instanceId + "_contact-form-name"' name='name' size='30' type='text' value=''/>
<p/>
<data:contactFormEmailMsg/> <span style='font-weight: bolder;'>*</span>
<br/>
<input class='contact-form-email' expr:id='data:widget.instanceId + "_contact-form-email"' name='email' size='30' type='text' value=''/>
<p/>
<data:contactFormMessageMsg/> <span style='font-weight: bolder;'>*</span>
<br/>
<textarea class='contact-form-email-message' cols='25' expr:id='data:widget.instanceId + "_contact-form-email-message"' name='email-message' rows='5'/>
<p/>
<input class='contact-form-button contact-form-button-submit' expr:id='data:widget.instanceId + "_contact-form-submit"' expr:value='data:contactFormSendMsg' type='button'/>
<p/>
<div style='text-align: center; max-width: 222px; width: 100%'>
<p class='contact-form-error-message' expr:id='data:widget.instanceId + "_contact-form-error-message"'/>
<p class='contact-form-success-message' expr:id='data:widget.instanceId + "_contact-form-success-message"'/>
</div>
</form>
</div>
</div>
<b:include name='quickedit'/>
</b:includable>
</b:widget>
After that you have to save the template ,then go to Pages ,and paste the following code into a html of new page with the title you want :
<div class='widget ContactForm' id='ContactForm1'>
<div class='contact-form-widget'>
<div class='form'>
<form name='contact-form'>
<p>Name<p>
<input class='contact-form-name' id='ContactForm1_contact-form-name' name='name' size='30' type='text' value=''/>
<p>E-mail *</p>
<input class='contact-form-email' id='ContactForm1_contact-form-email' name='email' size='30' type='text' value=''/>
<p>Message *</p>
<textarea class='contact-form-email-message' cols='25' id='ContactForm1_contact-form-email-message' name='email-message' rows='5'></textarea>
<input class='contact-form-button contact-form-button-submit' id='ContactForm1_contact-form-submit' type='button' value='Submit'/>
<p class='contact-form-error-message' id='ContactForm1_contact-form-error-message'></p>
<p class='contact-form-success-message' id='ContactForm1_contact-form-success-message'></p>
</form>
</div>
</div>
</div>
Messages will be sent on the email on which you register your blog
Thats it,
if u have any questions or comments please post below


No comments:
Post a Comment